Using regions
Tag items on your canvas by the area they sit in, so participants can categorize work as they collaborate
Regions let you turn parts of your template canvas into labeled categories. When a participant drops an item inside a region during an event, the item is automatically tagged with that region's name — no extra clicks, no manual sorting. Use regions when you want spatial placement on a board to mean something analyzable.
What regions do
A region is a named area you draw on your template canvas — either a rectangle or a freeform polygon. Regions live inside a region group, which acts like a category dimension. A template can have multiple region groups, and an item can sit inside one region from each group at the same time.
How regions become data
The names you choose in the Regions panel are exactly what appears in Table View — they're not translated, computed, or generated. Two simple rules plus one default:
- A region group's name becomes a column header in Table View.
- A region's name becomes the cell value in that column when an item sits inside the region.
- An item outside every region in a group leaves that cell blank.
See it in the Venn template
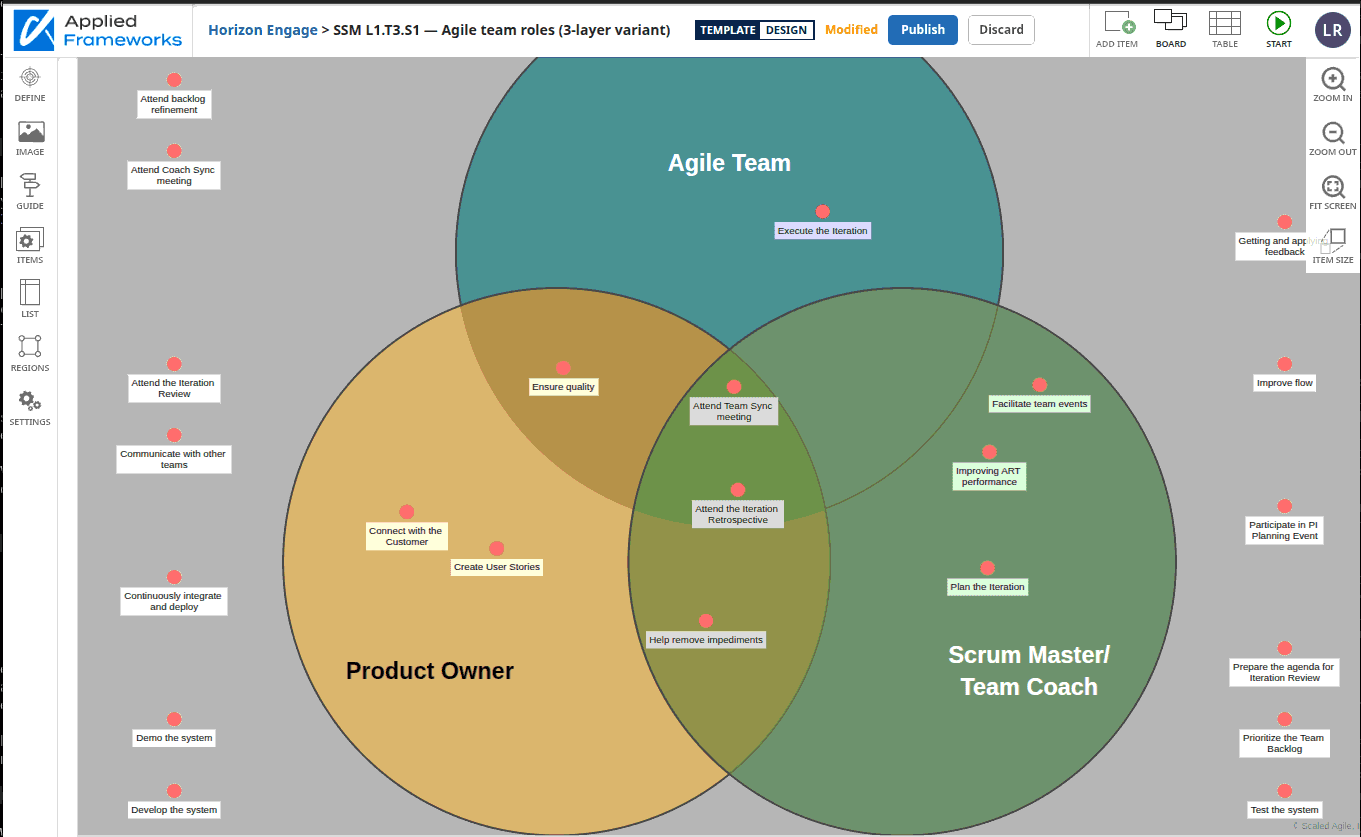
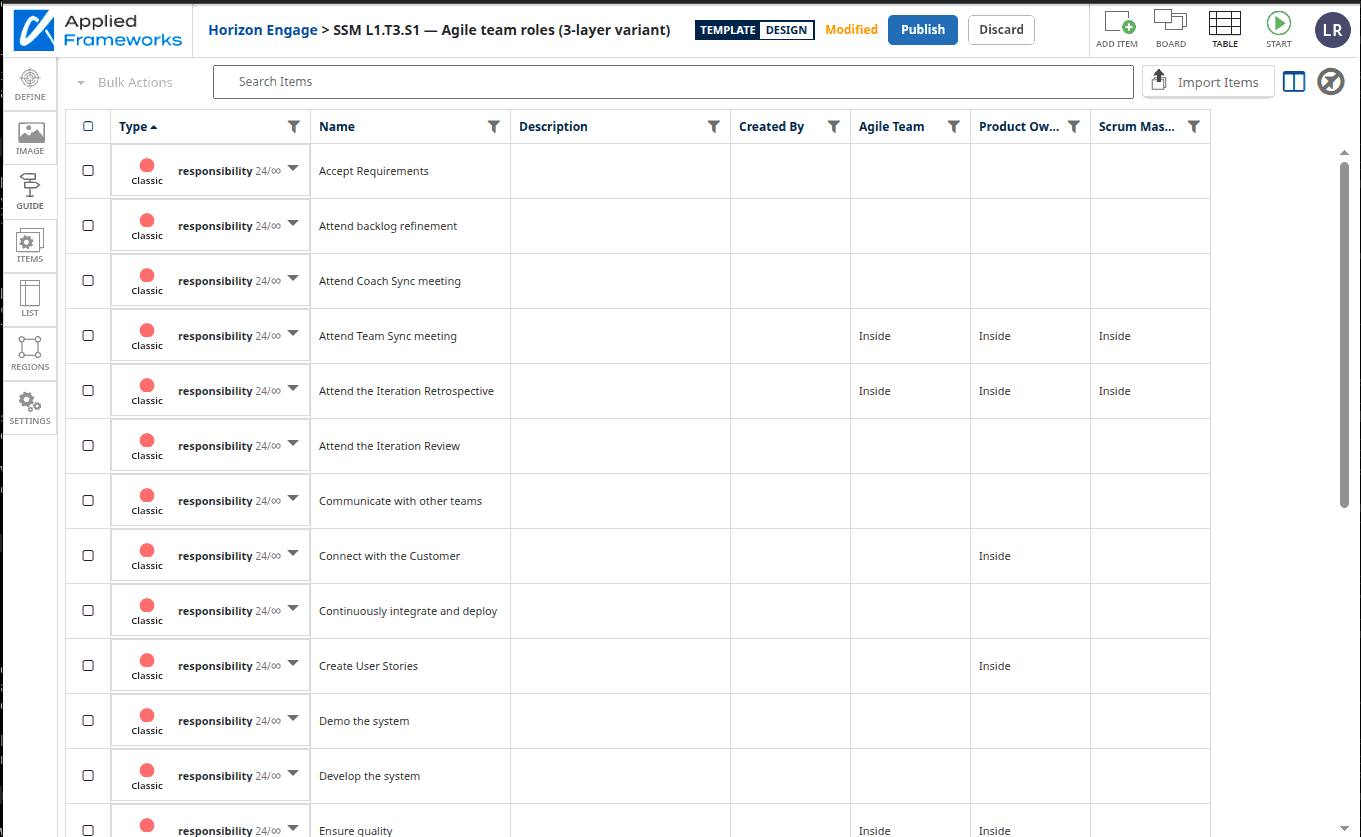
In the template above, the region groups are named Agile Team, Product Owner, and Scrum Master/Team Coach. Inside the Agile Team group, the single region is named Inside:

Those exact names flow straight through to Table View. The column header reads Agile Team. Rows for items that sit inside the Agile Team circle read Inside in that column. Rows for items outside the circle leave the cell blank:
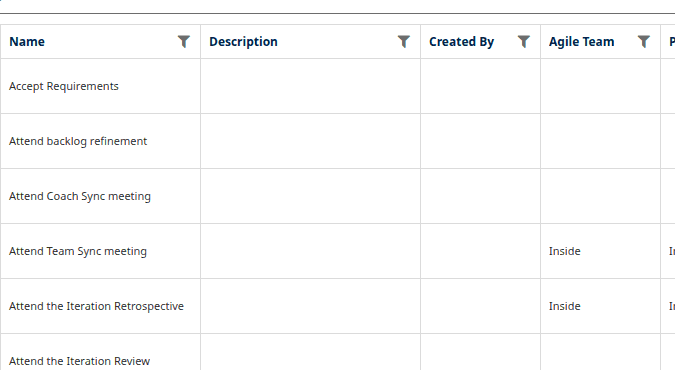
If we'd named the region Yes, Member, or Belongs, the cells would read Yes, Member, or Belongs instead. Pick names that read well as data values — short, descriptive, and meaningful in isolation (you won't see the group name in the cell).
Choosing a regions pattern
Three patterns cover almost every situation:
| Pattern | Shape | Use when |
|---|---|---|
| One column, exclusive values | One region group with several non-overlapping regions | Items belong to exactly one category — e.g. funnel stage: Discover, Define, or Deliver. |
| Multiple yes/no axes (Venn) | Several region groups, one region each, drawn so they overlap | Items can belong to several independent categories at once — e.g. Is this a role of Agile Team? Product Owner? Scrum Master? |
| Multiple multi-value axes | Several region groups, each with several non-overlapping regions | You want to track items along more than one independent dimension — e.g. Priority (High/Medium/Low) and Stage (Discover/Define/Deliver). |
The shape of the regions on the canvas determines the meaning. Overlapping regions inside one group behave differently from regions in separate groups — see Things to watch out for.
Before you begin
Drawing and editing regions happens in Define mode on a template. You'll need permission to edit the template. Once an event is running, regions are frozen — plan your regions before publishing.
Draw a region
Open the Regions panel
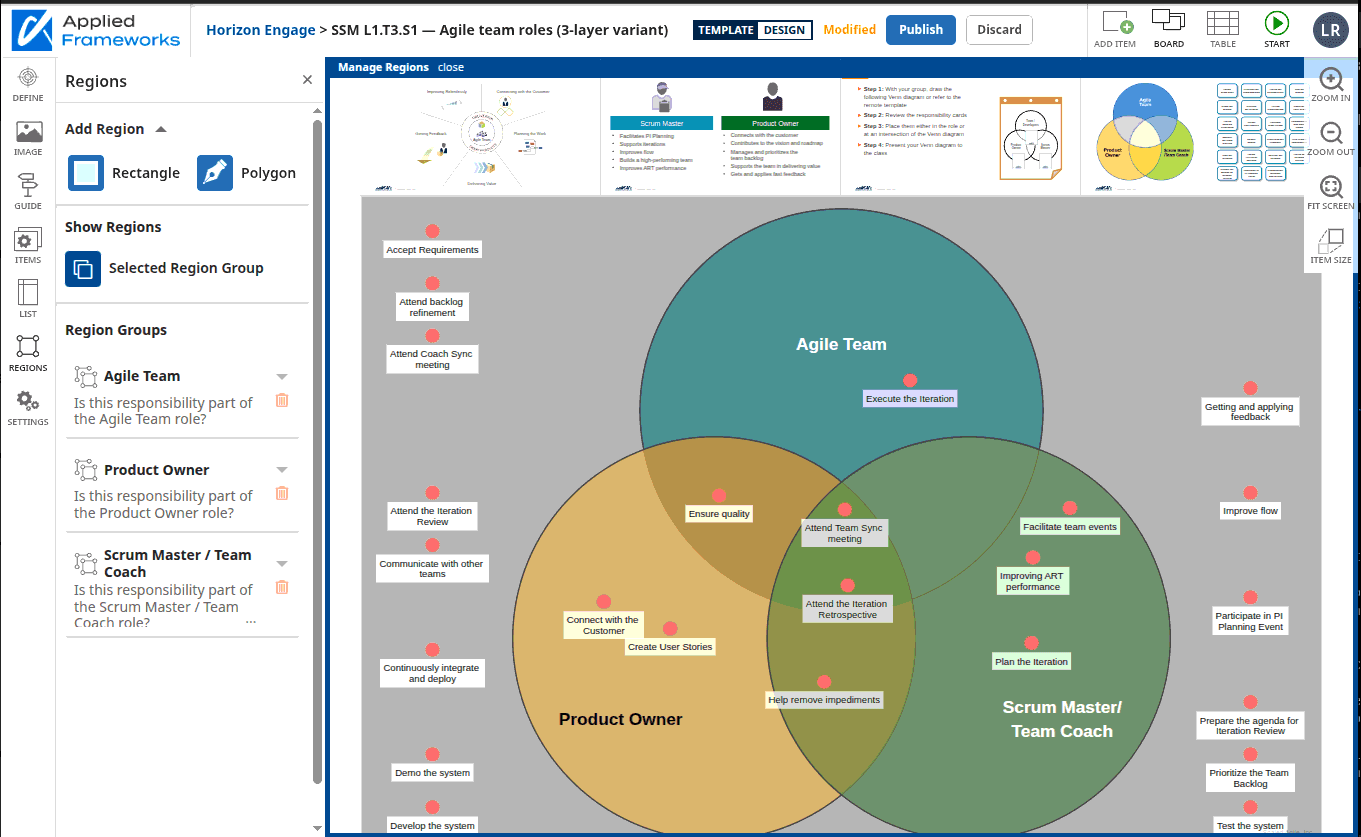
In Define mode, select the Regions tab on the left rail. The Regions panel opens with any existing region groups listed at the bottom.

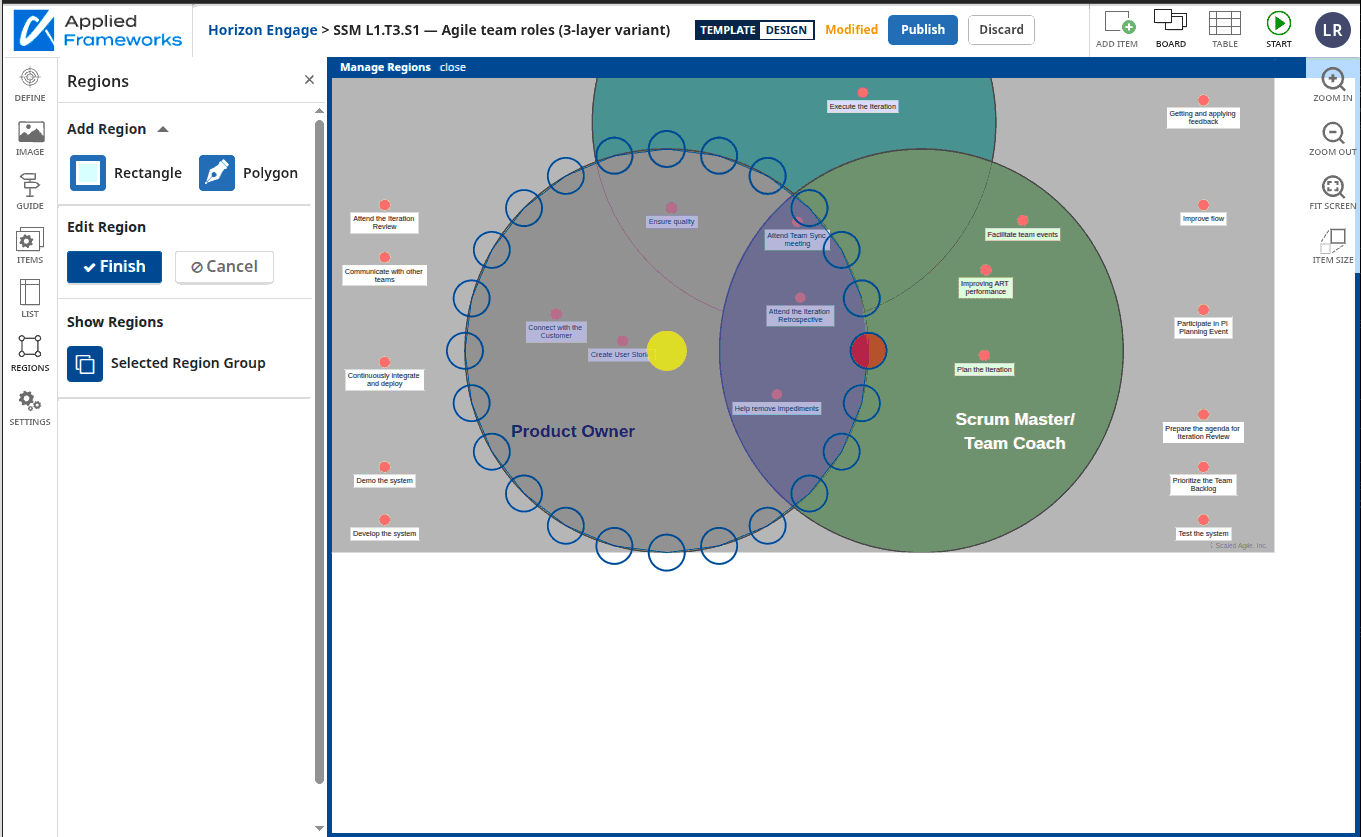
Draw the shape on the canvas
- Rectangle: click to place one corner, click again to place the opposite corner, then drag to resize. Select Finish in the panel when the shape is right.
- Polygon: click to place each anchor point (you need at least three). Double-click the starting anchor or select Finish to close the shape.
Pick or create a region group
After you click Finish, the Create Region modal opens. Use the Region Group dropdown to decide where this region belongs:
- Add to an existing group: pick the group's name from the dropdown.
- Create a new group: pick Add a new group. Two more fields appear so you can name and describe the group. The new group will hold this region as its first member.
You cannot create an empty group separately — every new group is created together with the region you're drawing.
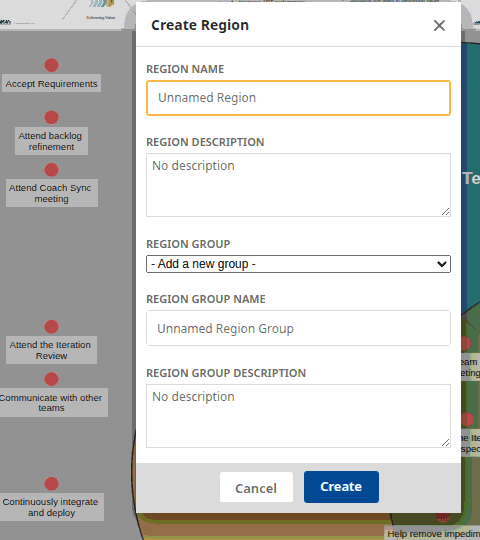
Name the region and save
Type a name in the Region Name field. This is the value that appears in Table View for items inside the region, so pick something short and meaningful (e.g. High, Discover, Inside). Optionally add a description — participants and admins see this when hovering the region.
Select Create. The region (and any new group) is saved.
To rename a region or group later, select its name in the Regions panel to edit inline.
To draw more regions in the same group, repeat from step 3. To draw in a different group, go back to step 2.
Read results in Table View
Open Table View
In Define mode or while an event is running, select the Table button on the right toolbar.
Find the region columns
Each region group becomes its own column, with the group's name as the column header. Each cell shows the name of the region the item sits inside, or stays blank if the item is outside every region in that group. Scroll right if you don't see the columns — they sit after the standard item columns.
Filter or sort
Select the filter icon on a region column header to show only items in specific regions. Select the column header itself to sort alphabetically.
What participants see during an event
During a running event, participants see the same canvas you set up. If you've enabled Show Regions, the region outlines and labels appear on the canvas so participants can see where to drop items. Region membership updates in real time as items move — a participant dragging an item across the canvas will see it pick up new region tags as it crosses region boundaries.
Participants cannot create, redraw, or rename regions. Only facilitators with edit access can change regions, and only outside of a live event.
Things to watch out for
- Overlapping regions in the same group: if two regions inside the same group overlap on the canvas, items dropped in the overlap zone are tagged with whichever region was created first — not the one drawn on top. Avoid overlap within a single group, or expect this first-match behavior.
- Blank is not missing: a blank value in a Table View region column means the item is outside every region in that group, not that data is missing. Use the column filter to find unassigned items.
- Regions are fixed once an event starts: redraw or add regions before publishing the template. Mid-event changes are not supported.
- Plan region layout for participants, not just authors: participants will be reading the labels in the heat of collaboration. Short, descriptive region names beat clever ones.